Overview
This codelab shows you how to create your own Codelab and contribute it to this site for the QNX community.
We use the open-source Google Codelabs Tools to build the codelabs, but you really only need to know how to write Markdown files.
Workflow
Below is the high level workflow we'll work through in this codelab:
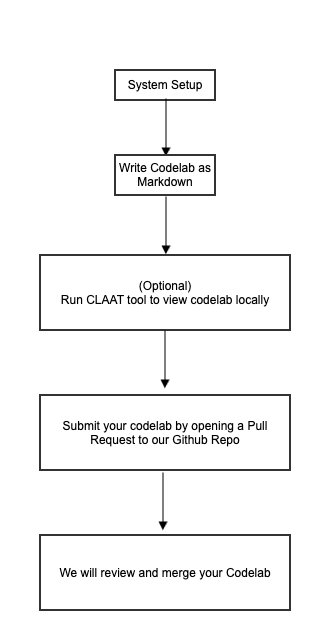
Let's get started! Next, we'll install the pre-requisites to prepare your environment.
Pre-requisites
- Get an IDE or editor. We recommend VS Code.
- Be familiar with some GitHub basics, so you can contribute your codelab back to the community (See the GitHub Learning Portal).
That's it! Since the codelabs are just written as Markdown files, this is all you really need. Optionally though, you may wish to install Claat so you can render and preview your work locally.
Build Claat from Source
This step is optional, but highly recommended so you can fully render and preview your codelab in your local environment.
- Install Go, which is needed to use Claat.
- After the install, set these updated environment variables in your terminal session:
# Install go globally as environment variable export PATH=$PATH:/usr/local/go/bin export GOPATH=$HOME/go export PATH=$PATH:$GOPATH/bin - We have taken Google's Open Source Claat Tool and customized it for QNX codelabs. So clone the repo from the QNX fork: https://github.com/qnx/tools:
git clone https://github.com/qnx/tools.git - Navigate to the
claatdirectory:cd tools/claat - Use
goto build Claat:go install - Verify go and Claat are now working correctly in your terminal:
go version
claat --help
Your system should be ready to start writing codelabs!
Follow these guidelines to write a high-quality codelab.
- Focus on one specific goal in each codelab. Separate multiple goals into different codelabs.
- Add an Introduction page describing the codelab's purpose and outcome.
- Include a System Set Up section or page for pre-requisites and information about any important resources.
- Use code snippets and videos where possible to help convey exact information.
- Break content into small, independent sections so it is easier to follow.
- Always create a GitHub fork or branch for your contributions.
Now that you are ready to build a codelab, you nedd to fork and clone your own copy of the codelab repo.
- Fork the main QNX Codelabs repository
- Clone your fork locally using SSH or HTTPS (or alternatively, the GitHub CLI):
# Make sur to use the correct clone URL for your fork: git clone https://github.com/your-username/codelabs.git # OR git clone git@github.com:your-username/codelabs.git - It is helpful to to work on a new branch, therefore perhaps create a branch where you will commit and push your changes. When you're finished authoring, you'll use this branch to submit a Pull Request back to the QNX project.
git checkout -b <name-of-your-codelab>
This section explains how to create a new codelab.
Only work in the markdown folder under your created codelab repo's new directory. Ensure you do not make changes to other folders or files, so that your contribution is clean and doesn't interfere with other draft codelabs. Inconsistencies or changes to other files will unfortunately result in a rejected pull request.
- Create a New Folder for your codelab at
~./markdown/:mkdir -p ./codelabs/markdown/<name-of-your-codelab> - Copy
markdown-template.mdinto your newly created directory, from the `codelabs/ dir, to ensure the required tags are included in hyour draft.Theidtag must exactly match the.mdfilename for Claat to work correctly.id: name-of-your-codelab title: template to create codelabs summary: Learn how to add new Codelabs categories: codelabs, setup tags: beginner difficulty: 1 status: published authors: Your Team feedback_link: https://github.com/qnx/codelabs/issues - Rename the markdown file as
.md - (Optional) Run
claatto view your.md # cd out from ~./markdown/<name-of-your-codelab> dir to ~./codelabs claat export -f html -o docs ./markdown/<name-of-your-codelab>/<name-of-your-codelab>.md - You will see some output in the terminal and a new directory with the same codelab name will be created under
codelabs/docs. - Now run the Claat server to view the HTML locally at
http://localhost:8000from yourcodelabs/docs/directory# cd to ./codelabs/markdown/<name-of-your-codelab>/ claat serve <name-of-your-codelab>.md - Stage your changes to prepare for submitting a pull request (PR) back to the QNX source repo.
# From the ~./codelabs/markdown/<name-of-your-codelab> directory

git add .
git commit -m "add comments for your commit"
git push -u origin name-of-your-codelab
Congratulations! We will review and add your pull request soon. Thank you for contributing to QNX Codelabs!